Tuesday, December 4, 2012

Homemade Breakfast Burrito with Homemade Tortillas

My husband loves a quick breakfast item and homemade breakfast burritos are his favorite. He throws them in the oven (we don't own a microwave for many reasons) when he wakes up and they are ready by the time he is dressed and out the door to work. I wrap our burritos in aluminum foil so they can be thrown in the oven, but you could use freezer paper if you are going to microwave them.
Homemade Tortilla Recipe from Joy of Cooking
4 C all-purpose flour
1tsp. Salt
2 tsp. baking powder
2 Tbsp. crisco (I substitute with butter)
1 1/2 C water
Whisk flour, salt, and baking powder together in mixing bowl. Mix in crisco (or butter) until it resembles cornmeal. Add the water and mix until it comes together; place on floured surface and knead until it becomes smooth and elastic (you can also use your mixer with a dough hook). Divide and roll into 24 balls. Let rest for approx. 20 mins.
Preheat a skillet over medium heat. Using a floured rolling pin roll each dough ball into a thin, round (or mostly round, at least in my case) tortilla. Place onto hot skillet, cooking just a few minutes on each side. Devour or make some breakfast burritos!
Breakfast Burrito Mixture
1 lb Breakfast Sausage
.5 lb Bacon
12 Scrambled Eggs
1/2 Red Onion (finely chopped)
1 small can Green Chilis
1 packaged of mushrooms sautéed
2 Roma Tomatoes
2 C Homemade home fries
1 C cheese (cheddar is our favorite)
Add any other fixings you enjoy!
Place ingredients on warm tortilla and roll burrito style. We place ours in aluminum foil and freeze because ours are reheated in the oven. If you are using a microwave to reheat I would place on wax paper or freezer paper and freeze. When you are reheating I would remove the paper and nuke for no more than 2 mins. If you are reheating in an oven I would take the burrito out the night before and cook in the morning in the foil for 12-15 mins at 350 degrees. If you forget to take it out the night before it can take 30 mins to cook at 400...which means it is no longer a quick breakfast!


Monday, October 1, 2012

Cheddar Crackers

Cheddar Crackers

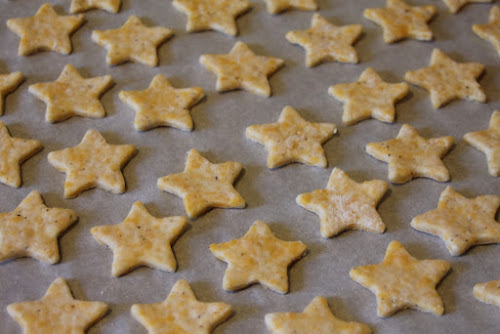
I'msure you've seen the posts for Goldfish Crackers on Pinterest, this is that recipe...but I really don't think they taste like Goldfish, these are better! Plus I wasn't as crafty as others by making a goldfish cracker cut out. Here's the delicious recipe! (Try not to eat them all in one sitting, it's hard!)

Cheddar Crackers

1 C flour. 4 Tbsp butter (cold)

3/4 tsp salt. 2 C shredded cheese

1tsp baking powder

1/4tsp pepper

1/4 tsp seasoning (onion, all purpose, garlic, or whatever you like)

1. Put flour, salt, baking powder, pepper, and seasoning and pulse in your food processor.

2. Add butter and cheese and pulse until it is crumbly.

3. Add water one Tbsp at a time until the mixture forms a ball in the food processor. (I think I use about 1/8 of a cup of water but haven't tested that for accuracy.) Take out and shape into a ball, cover the entire ball in Saran wrap or whatever you have on hand (I used wax paper). Place in the fridge for about 45 mins.

4. Now roll that loaf out onto a floured surface until it is approx. an 1/8" thick. Cut out your shapes...these are soft enough to make larger shapes, but the little hands in my house like them their size.

5. Place shapes onto parchment lined baking sheets. Place in the refrigerator for another fifteen minutes. Turn your oven on to 350 degrees.
(Yes, I have baked them directly on the cookie sheet, and yes they do stick some. I LOVE parchment paper, thanks mom for introducing it to me! Also it is imperative that the crackers are placed in the fridge, it really does allow for the cracker to have a better texture.)
 
6. Bake for approx. 15 minutes. (I can smell them baking!)

7. Cool and then devour!!! (Or blow on it a couple times and shove in your mouth....mmmmmmm.)

Yes, I have made this recipe a lot and have done lots of different combinations and here are some of my variations.

  • Add 1 C whole wheat flour instead of all purpose flour (a little drier)
  • Add 1/2 C whole wheat flour and 1/2 C all purpose flour (delicious)
  • I have tried all different shredded cheeses (favorite is cheddar, least favorite, but still not bad, mozzarella)
  • Seasonings, I have tried a ton of different things, my favorite is garlic. The only time I went wrong was when I didn't measure and just guessed...so actually measure.
  • I have cut out the crackers and frozen them. (Cut out, place on baking sheet, place in the freezer for anout an hour, remove from pan and place in freezer container.) I haven't baked them up yet, so check back for those results.

Truly these are so darn easy and so hard to screw up!

Happy Eating!


Finally Doing It

I have wanted to start a blog that would document all of my homemaking wonder fullness and of course the things that go south...so it will begin today. I am hoping to post at least 4 times a week and then in a month there will be a real working blog where I can join linky parties and start getting my name out there.

And so it begins...